
How to Export Products/Adverts .CSV from Your E-Commerce Platform
On this page you will find detailed instructions on how to export a product .csv file for the following e-commerce platforms
- Shopify
- Woo Commerce
- Maropost / Neto
- Big Commerce
- Lightspeed
- Magento
- Retail Express
SHOPIFY
You use a CSV (comma-separated values) file to import products into your Shopify store, and to export products from your store. By using a CSV file, you can import or export a large number of products and their details at one time. This can be helpful if you want to exchange product information between Shopify and another system.
If you export up to one page of products (up to 50 products), then the CSV file is downloaded by your browser. If you export more than one page of products (51 or more products), then the CSV file is emailed to you. If you aren’t the store owner, then the file is sent to the store owner’s email as well.
Steps: From your Shopify admin, go to Products.
Note: If you want to export only some of your products, then you can filter your product list to view and select specific products for export.
Click Export: From the dialog box, choose the products you want to export:
The current page of products;
- All products
- Products you have selected
- Products that match your search and filters.
- Select which type of CSV file you want to export:
- CSV file for Excel, Numbers, or another spreadsheet program. Use this format if you plan to use a spreadsheet program to edit your product CSV file.
- Plain CSV file. Use this format if you plan to use a plain-text editor with your product CSV file.
- Click Export products.
CAUTION: Sorting your CSV file in a spreadsheet program can cause product variants or image URLs to become disassociated. A CSV file with UTF-8 encoding is the only file format that can be used to import to or export from Shopify.
WOO COMMERCE
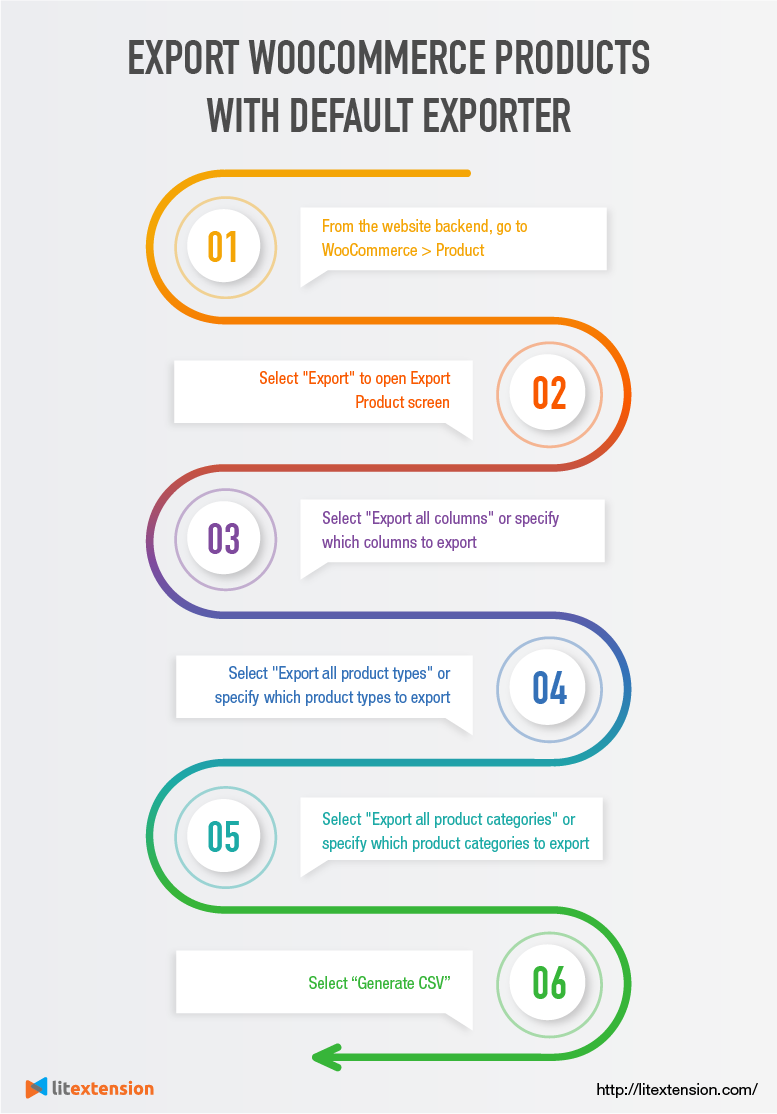
Step 1: Go to WooCommerce > Products and then select Export at the top to open the Export Products screen.
Step 2: Choose to Export All Columns or select which columns to export from the dropdown menu.
Step 3: Select to Export All Categories or select which categories to export from the dropdown menu.
Step 4: Click Generate CSV and wait for the WooCommerce export products process to finish.
For more information visit:
https://litextension.com/blog/export-woocommerce-orders-products/#WooCommerce-Export-Products
MAROPOST / NETO
Products can be exported into a CSV (comma separated values) file so that you can manually report or import into a third party system. You can also export product lists to make changes, and then import back into Maropost Commerce. There’s 2 ways to export your product details.
Simple Export
The simple export is best used for reporting, as fields can’t be customised as much and filters are limited. Third party applications will likely have a specific format required in which case the complex export is better suited.
To use the simple export:
- In your Maropost Commerce control panel navigate to Products > View products.
- Click the Export button at the top of the page
- Choose either CSV with popular fields or CSV with all fields and click the Preview button.
- Clear any checkboxes for fields you don’t want exported, and click the Export button.
- The CSV file of your product will be created. Click the Download button when it appears, to save the file to your computer.
Complex Export
The complex export wizard gives you a lot more control over the fields that are exported, filters, and allows you to set up schedules to export on a regular basis. To use the complex export wizard:
- In your Maropost Commerce control panel, navigate to Settings & tools > Export data.
- Select the Products radio button.
- Click the Perform complex export button and choose the Start Data Export Wizard option.
- Enter a name for your file and click the Continue to Next Step button.
- You now need to choose which product fields you want to export. Click the Add New Field To File button, and choose the fields from the drop down menus.You need to select a field type first (e.g. product data, pricing, image and URLs) and then choose the field name.
- Repeat the previous step and add all the fields you need in your file. When complete, click Continue to Next Step
- You can now determine which products are included in the file by selecting filters. For example, enter a number in the balance from field to see products who owe money.
- When you’ve finished selecting your filters click the Continue to Next Step button.
- In the Send Export File To field, select how you want to receive your product export file.Tips: Be sure to include the Product Data > SKU field as this is used as the unique identifier for your products.You can change the column header for each field on the right hand side of the page. This is useful if you export to a third party system that has specific field name requirements.To filter by multiple values separate them with a space (e.g
SKU1 SKU2 SKU3)Choose Local URL to save the file in your site assets, so it can be downloaded when ready. You’ll be shown a URL where it can be downloaded from.
| Export Method | Description | Steps |
|---|---|---|
| Send the file as an attachment on an email. | Enter your Email Address. | |
| FTP | Save the file on another server. | Enter the server FTP Location, FTP Username and FTP Password. |
| External URL | Post the file to another server (advanced option). | Enter the External URL, FTP Username, FTP Password and any other required fields. |
| Local URL | Save the file to a folder on your site. | Enter a Folder Name (or leave blank for the default location). |
- Make sure you add any required details (e.g. email address, FTP username/password) depending on your selection.
- Select the checkbox if you want to save the export settings (name, fields, filters etc) so that you can run the export again later. If you do, enter a template name and optionally select an automated export schedule.
- Click the Export Now button.
BIG COMMERCE
Exporting Products
1. Go to Products › Export.
2. Select your export settings by selecting a Template – Built in Templates or Bulk EditTemplate
— We recommend Bulk Edit if you are not using a custom template.
Select File Format: Export to Microsoft Excel .CSV
— File Format — You can export your file as a CSV or XML. We recommend CSV as any other file type will not import.
3. Click Continue, then click Export my Products to a CSV file in the pop-up window. The export will begin to process.
Export Products popup: Click the link to begin the export. When the export is complete, a link will be displayed, to allow you to download the file:
4. When the export is complete, select Download my Products file. The file will be saved to your computer, usually in your Downloads folder.
https://support.bigcommerce.com/s/article/Importing-Exporting-Products?language=en_US#product-export
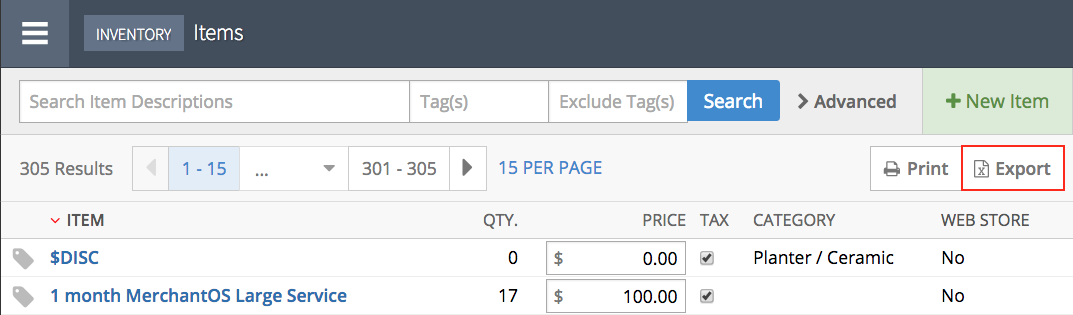
LIGHTSPEED
Exporting Inventory Data:
Click Inventory > Item Search.
NOTE: You can apply filters to only include certain items in your export. Please include all fields and items in your export
On the top right of your search results, click the EXPORT button.
This will automatically create and download your CSV export file.
https://retail-support.lightspeedhq.com/hc/en-us/articles/229128748-Exporting-inventory-data
NOTE: If you’re exporting item data that includes their default cost, the Inventory – Product Cost permission is required to have this data included in the CSV file.
MAGENTO 2
Export Products CSV from Magento
Open the Admin panel of your store and go to SYSTEM → Export

Select
ENTITY TYPE > PRODUCTS
EXPORT FILE FORMAT > CSV
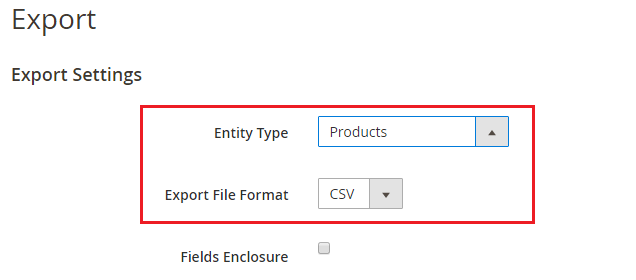
Exclude the unnecessary attributes from the list by selecting them and then click on CONTINUE from the bottom of the page:
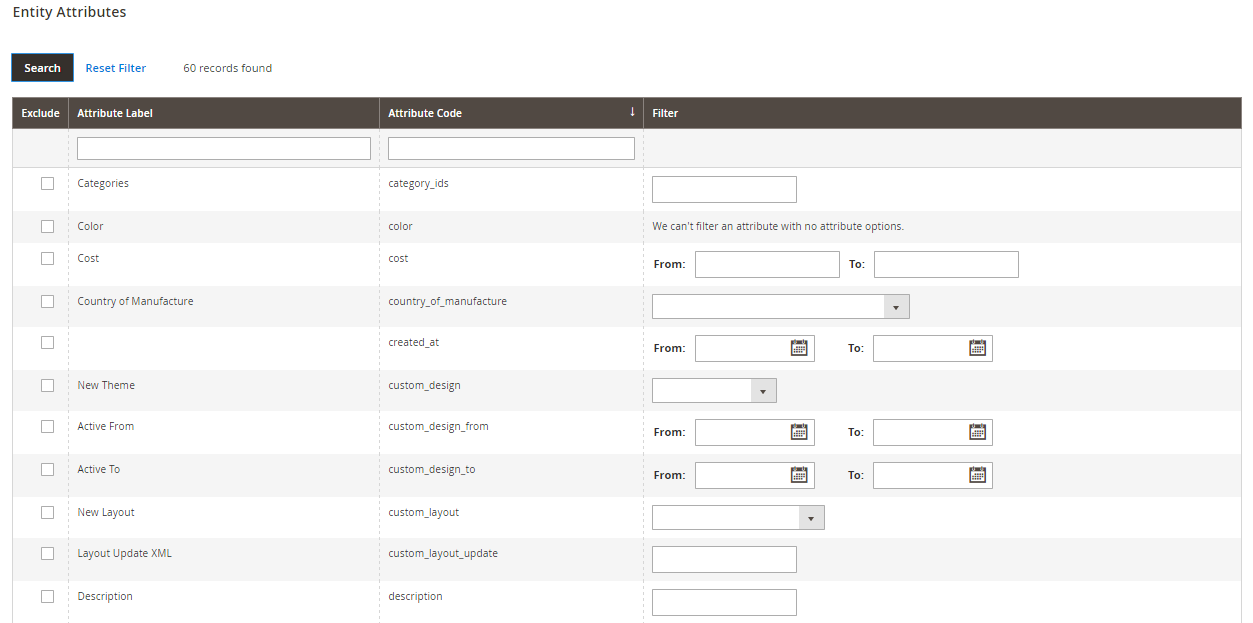
CSV will download to your devise ( usually in the downloads folder )
RETAIL EXPRESS
You can manually share your Retail Express inventory by following the instructions below.
In your Retail Express system go to Inventory and select “Mass Download”.
This will generate an Excel file containing all product data and stock levels.
Save the file as a .csv, file.